Markey Robinson

ARTISTS WORKING ON THIS PAINTING
CHARLIE M. FRIDAY ONLINE ZOOM CLASS
KATHLEEN MC.D. MONDAY ZOOM CLASS
SAMANTHA L. MONDAY ZOOM CLASS
TOM Mc.C FRIDAY ZOOM CLASS
KATHLEEN F. THURSDAY ZOOM CLASS
DORIS C. THURSDAY ZOOM CLASS
CÉLINE O’F THURSDAY ZOOM CLASS
MARIE F THURSDAY ZOOM CLASS
Hi everyone and welcome to the first of our tutorials following up from our most recent Zoom Class.
This will be a step by step approach. If you have anything you want advise on or a few extra tips, you can phone me any day at 085 233 7413 between 10am and 8pm
STAGE ONE CHOOSING AND PLANNING YOUR CANVAS
I would suggest a 50×40 cm canvas for this painting which would be a 5 to 4 divide. (you may also use a 40×30 cm canvas but then you must use a 4 to 3 divide)
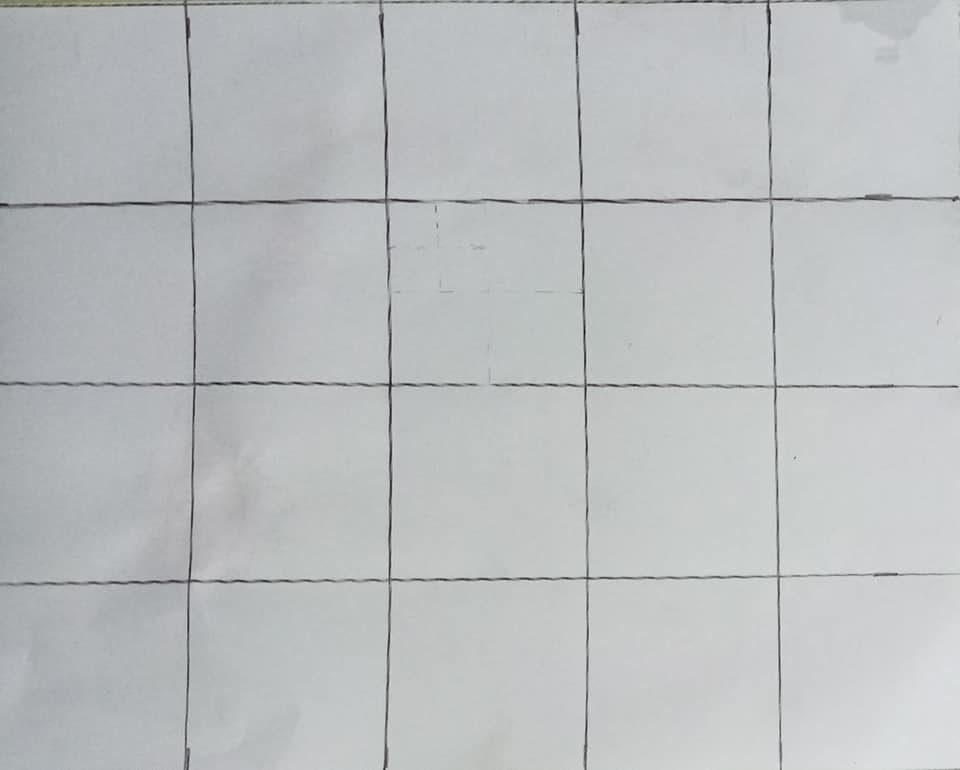
Divide your 50×40 cm canvas into the areas shown above and then follow up with the same process on your picture below.
Remember, whatever you do on your canvas, you must also do with your picture
STAGE 2 PLANNING YOUR DRAWING

Look at your picture and see what the most challenging areas are. In this case I have started with the second row down over to the right (see above) What I would suggest you do to make things easier would be to ‘sub-divide these areas but only as you go along and only where you need to do so otherwise you could make it too confusing.
You will find that it will help you through the most difficult parts of your drawing.
Please remember what I said earlier….whatever you do on the picture you must also repeat on the canvas.
STAGE 3 YOUR PENCIL DRAWING AND INKING.
After you have completed your drawing with pencil you should then proceed with a process what’s known as ‘inking’
Inking your drawing helps you to see the painting more clearly, stops your pencil line from influencing your colours and takes the intimidating look of a freshly sketched canvas and somehow appearing to make your task ahead a lot easier
To make up the ink you should pour a few drops of white spirits into a jam jar lid and put a little Burnt Sienna paint into your lid mixing them together until you transform your paint into a flexible ink like mixture, not too strong or not too weak, just enough to allow your smallest paintbrush to glide over your pencil lines.

This is what you should end up with.

STAGE 4 STARTING THE SKY AND BACKGROUND

We start the painting of the sky area with a light coat of white followed Coeruleum Blue, French Ultramarine Blue and if you have it, a little Cobalt Blue. Please note that skies are generally slightly darker the further up the canvas you go.
Roughly track your mountain at this stage with some Coeruleum Blue with hints of the other blues through this. Please don’t over blend. Leave some brush marks show.
Try not to settle for just one shade. Always be on the look out for different tints and shades in all areas. (see background mountain below as an example)

STAGE 5 TREES AND BUSHES
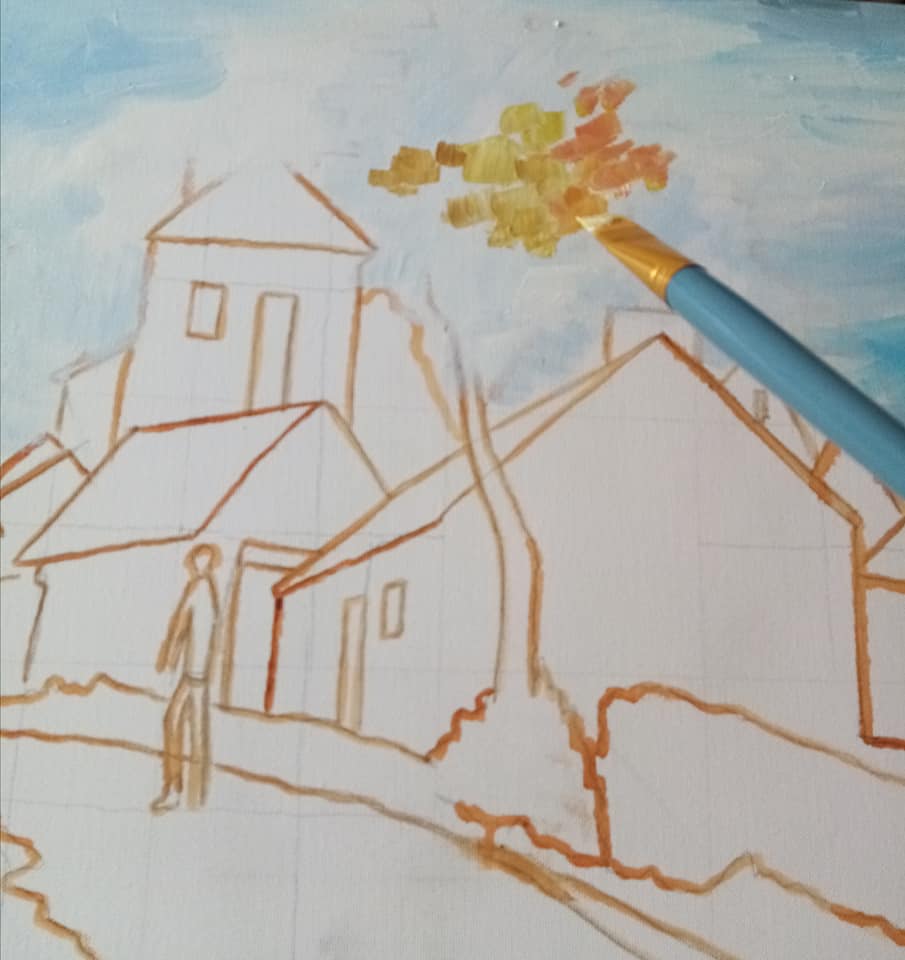
For the trees and bushes you will need to use Yellow Ochres, Coeurelum Blue, French Ultramarine Blue, Cadmium Red, Sap Green, Cadmium Yellow. Place these colours roughly in the areas that they occupy. Do not worry about blending at this stage, just PLACE.
Use a small flat topped sable brush for this. (see above)
I have purposely used slightly brighter colours than the original that can be darkened at a later stage nearer the end of the painting.

Please put the leaves on the tree with Yellow Ochre paint followed whilst still wet , with Oranges, and Burnt Sienna, Burnt Sienna mixed with Cadmium yellow etc. Don’t be too fussy with them as if you are – you may lose the free flowing movements of this painting.
STAGE 6 ROOFS

Start the roofs with a Yellow Ochre basecoat and apply base coat.
Begin the toning whilst the base coat is still wet.
Colours needed for toning are as follows. Burnt Umber Brown, Orange, Cadmium Yellow, and touches of Crimson Alizeron.
Place the colours in their areas and begin to tap tone them, gently introducing each colour to each other. Repeat this process with each roof.
When complete apply a little of white base coat to the gable so as to make the drawing of the blue outline along the edges a lot smoother (see below)
Use French Ultramarine Blue and some Payne’s Grey for the outlines.
Repeat this where necessary. Note some of the outlines are a little darker in parts and may require extra Payne’s Grey with the blue.


.STAGE 7 THE GABLES
I have selected the largest gable here to demonstrate how to tackle it and the remainder of the whites on the houses.
Paint a coat of white on tne white areas and then mix a light grey with a blue tinge. I have used a little French Ultramarine Blue with a little Raw Umber to achieve that stressed look, old and worn. Note that the fronts of the houses look a little darker than the sides in general so use a little more of your greys in these areas..
Look closely at the house on the left. You will notice a touch of Yellow Ochres in spots. If you look carefully at your working photograph you will notice this. You will find different examples as you explore each building.
I have roughly prepared my stone wall base by adding a darker version of this grey so when it comes to the wall stage, it will be easier to build the wall on top of this grey background rather than on a white one.

Tuesday July 7th at 12 noon
Continuing with our painting
STAGE 8 FINISHING ROOFS DEFINING WALL AND OUTLINING ALL

The first thing to do at this stage is to prepare all of the colours that you think you will need to finish this painting. I have put out Raw Umber, Burnt Umber, Burnt Sienna, French Ultramarine and Coeurilium Blues, Yellow Ochre and Yellow, Some Cadmium Red( to make the bright oranges) Viridian Green and Sap Green, Paynes Grey (to mix with other colours to get your various greys) and of course White.
Place your base coats on the remainder of the roofs. Remember the base coat must be the brightest colour in that particular area. In this case the base coat is Yellow Ochre. The remaining colours are put on straight after (see below)

When placing these colours , please make sure that you paint with the ‘movement’ of the roof.
The movement above is at an angle so paint your strokes roughly and at an angle. Use a small round headed brush for this.
DEFINING WALL AND OUTLINING

Now it’s time for the wall.
Please use a round head sable haired brush and roughly shape in your stones on the dry grey background. You should now see the benefit of having this area painted grey in advance as now it is much easier to see the white stone shapes.
Please make sure that the grey basecoat is dry before applying the white.
If you want to speed up the drying process for the grey base coat you can add a little white spirit to your paint. this will help it to dry faster.

When the stones are painted on top of the dry grey, you can now begin to place all the remaining shades on the individual stones with some Burnt Siennas and Coeurilium Blue/ French Ultramarine/ tiny bit of Paynes Grey mix on the wet white.
Mix some Paynes Grey with a very small amount of White Spirits (to start the outlines) until it becomes a little flexible, but NOT too watery.
STAGE 9 FINISHING TOUCHES WITH STREET AND FIGURE

We are finally at the end of this painting. From the last 8 stages you should be able to identify all of the remaining colours you will need for the various areas.
I will summarise them for you.
The Street starts off with a base coat white with touches of French Ultramarine, Yellow Ochres, Greys , Small amounts of Raw and Burnt Umbers.
Please make sure to do follow the ‘movement’ of the street (as you have done with the roofs at the last stage) angling these street colours in the same direction. This is very important as it helps to give the impression of a hill.
The ground at the bottom left hand side of the painting is different though. It’s movement is almost horizontal from left to right so the paint strokes should be placed horizontally so as to give a level impression.
The colours used in this area are as follows.
French Ultramarine and Coeurilium Blues
Sap and Viridian Greens
Yellow Ochre and Cadmium Yellow
A little Raw Umber and Grey (to rough it up)
Make sure to use the paint generously.
TOUCHING UP THE SKY
Finally I decided I wanted to add a little more drama to the painting so I decided to make the sky a little more threatening so I refreshed the original blues and whites that I had there and added some extra Paynes Grey / French Ultramarine Blues, making sure that both top corners were the darkest grey.

When touching up the sky please use a medium sized round head sable brush and once again paint with the cloud ‘movement’ which in this case can be either left to right or right to left

A detailed explanation on how to create the figure will be posted on this page on Wednesday August 5th.
______________________________
TIP FOR DRAWING THE FIGURE.

Draw a rough outline around the figure on your working photograph, starting at the tip of his head to the bottom of his feat to the extreme left and extreme right hand sides and divide it into six areas (see above)
Now go to your canvas
Repeat this process WITH CHALK on your canvas .(see below)

Now use this grid to draw your figure.
Good luck with it.
______________________